

- Access the terminal’s Android device settings by swiping up from the bottom of the terminal and look for the settings app. You may need to swipe up twice.
-
-
-
Click on “Network & Internet” then “Ethernet” be sure you are getting an IP address.
-
-
-
-
-
- If on a managed network, is it the correct IP address assigned to that terminal?
-
-
-
-
If it does not load, swipe up from the bottom of the screen to access all apps loaded on the terminal.
-
Click on ZipMDM Agent
-
You will see a Choose Your Company screen.
-
Click Plum then Proceed
-
-
Click Plum POS
-
Once Highlighted, Click Proceed – this will start the download of the latest version of Plum POS.
-
3. Next we need to set up the PAX device
-
-
On the PAX device, Click the Settings [icon] (it is located on the bottom row blue icon, second from right)
-
Enter the password: pax9876@@ (touch the box where the password needs to be entered and a keyboard will pop up on screen)
-
Click on Network and Internet
-
Make sure that Ethernet is toggled ON.
-
Click on Ethernet and make note of the IP address.
-
If you are on a managed network with assigned IP addresses, be sure this IP address is the correct one assigned.
-
-
Press the Red X in the bottom left corner to return to the main settings page.
-
-
Click on Display
-
Click Screen Timeout
-
Change the timeout to Never
-
Press the Red X in the bottom left corner to return to the main settings page
-
-
Scroll down until you see System and click on it
-
If the date, time, and time zone are correct to the local store time zone, then no adjustments need to be made.
-
If not, disable the “Use network-provided time” by toggling off the toggle and set the time manually.
-
Follow the same procedure for Time Zone adjustments
-
You may need to adjust the Region first to display the appropriate time zones.
-
-
Once the time zone, date and time are correct, switch the toggles back to active.
-
Press the Red X in the bottom left corner until you return to the app selection screen on the device.
-
-
Click on the PAXSTO… icon. (Blue and Red X icon)
-
In the Upper Left corner, you will see a small green circle with three horizontal lines. Click that circle
-
Click on Firmware Update
-
This will download the latest firmware and update the terminal. This can take 10-15 minutes to download and install depending on internet speeds. The device will restart several times during this process.
-
Once complete, the device will be at the main app selection screen.
-
-
Click on the Rapid C…. icon.
-
The app will begin initializing.
-
Once complete, an EULA prompt will appear. Click Do Not Show again, then click I agree.
-
A prompt asking for a password may appear. If it does, enter in the password pax9876@@, then the device will ask if you want to “Display Over other apps”. Toggle that on,then click the back arrow in the upper left corner.
-
This should bring you to the main payment screen, and display the IP address for the device for a brief moment in the top left hand corner.
-
-
-
PAX Device is now set up and ready to use.
-
-
-
Connect the ethernet cable and power supply cable to the kitchen printer and power the printer on.
-
If this is a Plum branded kitchen printer, a slip will print with the IP address automatically after 15 seconds. Skip to Step 5
-
For non-Plum printers, check the printer has an IP Address by running a printer self test.
-
Turn the receipt printer off.
-
Press and hold the Feed button
-
Turn printer back on then let go of the Feed button
-
A self test should print and you can see the MAC address and IP Address
-
Press the Feed button again to complete the self test
-
-
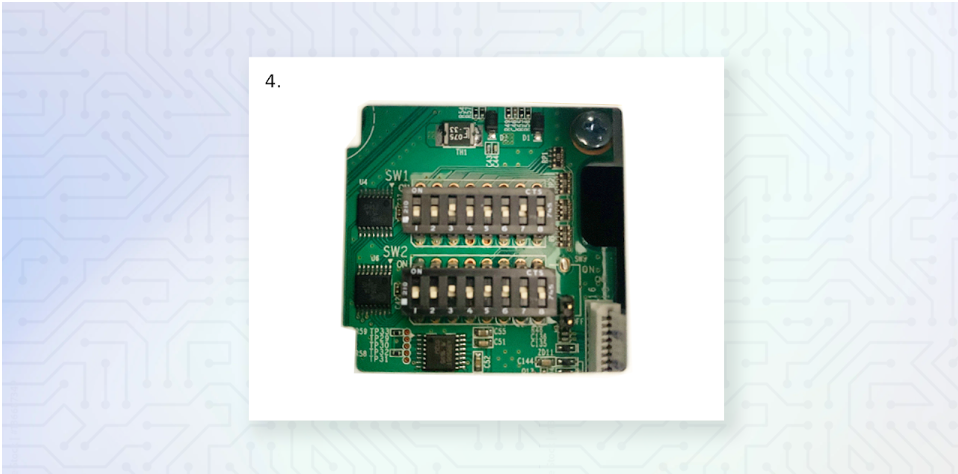
Set the dip switches to the correct settings. (Bixolon printers)
-
Turn the power off to the printer.
-
Dip Switches are located under the printer behind a small plate with a single screw.
-
SW1: 3 & 7 ON the rest OFF | SW2: 3, 5 & 6 ON the rest OFF
-
-
-
-
- Once switches are changed, Close and secure the cover and turn the printer back on.
-
For Printers other than Plum and Bixolon, if the printer is not printing as it should, check the manufacturer printer manual for that printer’s dip switch settings.
-
5. You will need access to the Plum account on a computer (desktop or laptop) in order to proceed, or contact a Plum POS support representative to continue.
-
- The local store General Manager should have access to the Plum back office systems and applications.
-
If you contact a Plum Support representative skip Step 6.
6. Once in the Hubworks applications on the computer, click on Plum POS
-
-
-
The first screen should appear on the Devices page. If not, using the left navigation bar, click on Devices
-
***NOTE*** If this is a DAY 2 or GO LIVE Install you MUST delete the Training Terminal before you continue if you have been learning in demo mode prior to go live day.
-
On the devices screen, you will see the Training Terminal listed.
-
To the far right of the screen you will see a Red Trash can
-
Click the Trash Can. You will need to confirm deleting the terminal twice.
-
The Training terminal will revert back to the beginning of the Zip MDM software and you will need to follow Step 2 once again.
-
When setting up the terminals, it is best to name the device where it is located.
-
Example : Cashier 1, Cashier 2, Drive Through 1, Bar 1 etc
-
-
On the Devices page, click the +Add button in the upper right hand corner
-
On the terminal screen, press Initialize Device in the lower right corner
-
At the top of the terminal screen, the IP address will be displayed and a 5 digit code will appear at the lower middle in a white oval
-
-
On the Hubworks add device page, Enter a name for the terminal – this can be anything (POS1 | POS-Right, Bar 1 etc)
-
Enter the IP address as displayed on the terminal screen.
-
Under Default Terminal click the drop down and choose the terminal – Options vary by client. – This step is to set the landing screen for the terminal default menu.
-
If this is being set up as a training unit prior to the Go Live date, toggle on Demo Device. If this is a Live terminal for operations, leave Demo Device on NO
-
If the PAX machine for this device is fully connected, toggle the Pay Device Setup to YES
-
You will see a drop down under Driver – Click PAX
-
Enter the PAX device IP address – noted from above steps
-
If you are installing USB connected terminal printers skip to step 4. For best results, all printers should be network connected and NOT connected via USB.
-
For a network terminal printer –
-
Click the toggle on for Remote Receipt Printer Setup
-
You will be prompted to enter the IP address of the network printer.
-
Enter the IP Address for that printer
-
If this is a Plum branded printer, when you turn the printer on the IP address will print about 15 seconds after turning it on. Skip to Step 4
-
If not a Plum branded printer, To retrieve the IP Address of the printer, you will need to run a self test.
-
Turn the receipt printer off.
-
Press and hold the Feed button
-
Turn printer back on then let go of the Feed button
-
A self test should print and you can see the MAC address and IP Address
-
-
-
-
-
-
4. Hit SAVE in the upper right hand corner
5. If you do not get auto directed to the devices page, Hit Back next to the save button. You should now see the terminal listed on the Plum POS Devices page
-
-
-
On the new device that was just added, you will see a blue [icon] to the right with an “i inside a circle” – Click that icon
-
A box will pop up on the screen that says Add Device
-
Enter the 5 digit code from the terminal screen in the box – My Activation Code is and click Submit
-
-
If correct, the Plum will show Syncing in progress and the terminal will respond. This process will take a minute or two to complete.
-
Once complete, the terminal will show the Log In screen.
-
-
-
7. The terminal, printer and credit card terminal should now be ready for use and Terminal installation is now complete.