

Unboxing and Setting up the Plum POS Terminal

Introduction
- Coaxial cable should be taped to underside of drawer
- Keys for the drawer should be taped to the front of the drawer
- Remove the white paper on the front of the cash drawer that says keys
-
- You will need to unlock the cash drawer for use. Insert key and turn left. Key should be in a horizontal position for the drawer to operate properly.
- Turn the key all the way to the left to open the drawer. Remove packing tap
4. Give the keys to the store manager after unlocking the drawer
Step 4:Unbox PAX devices
- PAX devices are terminal specific based on MAC address (Managed network only).
- Make sure to match the MAC addresses of each terminal and PAX device according to the install guide provided (Managed network only).
- There will be a connector cord bundle, back panel, USB power block, USB power cable and the PAX device in the box.
Step 5: Receipt Printer Setup – Use either step a or b. Don’t use both.
a.USB Printer Setup
- Connect the printer to the terminal using the enclosed USB cable.
- USB ports are located under the terminal.
- Either port can be used.
- USB-B port is located on the back of the printer.
b.Network Printer Setup
- Discard or save somewhere the USB cable for the printer
- Connect the RJ45 cable to the printer in the Ethernet port (for managed networks, check the MAC address to be sure you are connecting the correct printer).
- Follow instructions on the Configuration Sheet to activate the printer during terminal configuration
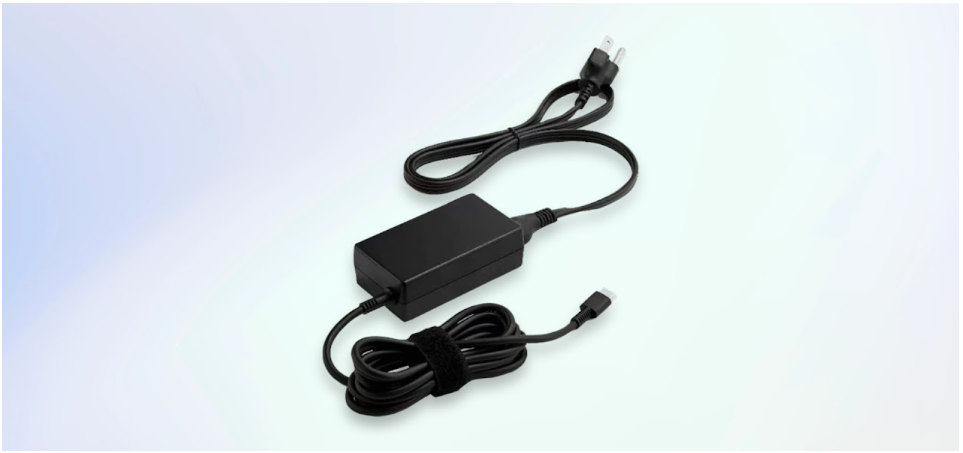
Step 6:Connect the power supply to the printer
- a. Be sure the power cord is also plugged into the transformer brick.
- b. Power supply only goes in one way. Check to avoid damage.
- c. Plug power supply into the power source.
Step 7:Load thermal paper into the printer. Thermal shiny side is to be facing out.
- a. Paper should be coming up from the bottom of the roll.
- b. Extend paper beyond serrated cutting strip and close printer top.
- c. Tear off excess paper across the cutting bar.
Step 8:Connect the Cash drawer to the printer using the RJ11 coaxial cable that came with the drawer.
- Coaxial port is located on the underside of the drawer.
- Coaxial port is located in the last port on the right on the back of the receipt printer.
- ***NOTE*** Cash drawer will not function if the printer is turned off.
- ***NOTE*** If utilizing an older existing cash drawer, you must use the cable that is already connected to the cash drawer to connect to the printer. Some newer cables are not always compatible with older cash drawers.
- Turn the printer on. If using a network connected printer, an IP address will print from the printer after 15 seconds. You will need this information to configure the printer for the terminal.
Step 9:Attach the PAX machine to the network
- On the cable bundle, find the flat/angled USB-C end and connect it to the underside of the PAX device with the flat side against the unit.
- Move the adjustable plastic grommet so it sits in the groove at the base of the device between the screw holes.
- Attach the back panel to the device using the two screws attached to the back panel. Screw in place to secure using a small Phillips head screwdriver.
- Connect the USB power cord to the power block and junction where all cables meet.
See picture below
5. USB-C power cable goes here
6. Next you will need to attach the ethernet cable (not included in the box) to the red ethernet port as seen in the picture above. This ethernet cord should be connected to the local network.
-
- NOTE the Serial cable and USB-A cables coming off the junction will not be used. Leave them tied up.
7. Plug the USB-C Power block into the power source
-
- PAX devices should power up automatically once power is supplied to the unit.
- There will be some configurations needed to get the device ready to accept payment. Configuration should be completed once all steps on this sheet are completed.
- Check to be sure that the unit is getting an IP Address
- On the PAX device, Click the Settings icon (it is located on the bottom row blue icon, second from right)
- Enter the password: pax9876@@
- Click on Network and Internet
- Make sure that Ethernetis toggled ON.
- Click on Ethernetand make a note of theIP address. This information is needed to configure the PAX device to the terminal.
- If you are not receiving an IP address, check if the ethernet cables are connected properly.
- You may need to restart the device for it to pick up the IP address once all ethernet connections are correct and functioning properly
- Press the Red X in the bottom left corner to return to the main settings page.
Step 10:Finish terminal connections
- All connection points for the terminal are located under the terminal at the bottom of the screen.
- All cables to the terminal can be run up through the terminal base for added security and protection as well as a clean look.
- Attach ethernet cable connected to the local network into the ethernet port.
- Connect the power cord to the terminal in the power port.
- Connect the power cable to a power source.
- If the terminal does not come on right away, the power button is located at the bottom right corner of the terminal just under the screen. Press the button to turn the terminal on (Small silver button.).
- Configuration steps will be provided on a separate document. Link to the document is on the last step.
Step 11: Set up the kitchen Printer onto the network
- Connect the ethernet cable and power supply cable to the kitchen printer and power the printer on.
- Check the impact printer has an IP Address by running a printer self-test.
- Turn the impact printer off
- Press and hold the Feed button
- Turn printer back on then let go of the Feedbutton
- A self-test should print, and you can see the MAC address and IP Address
- Press the Feedbutton again to complete the self-test
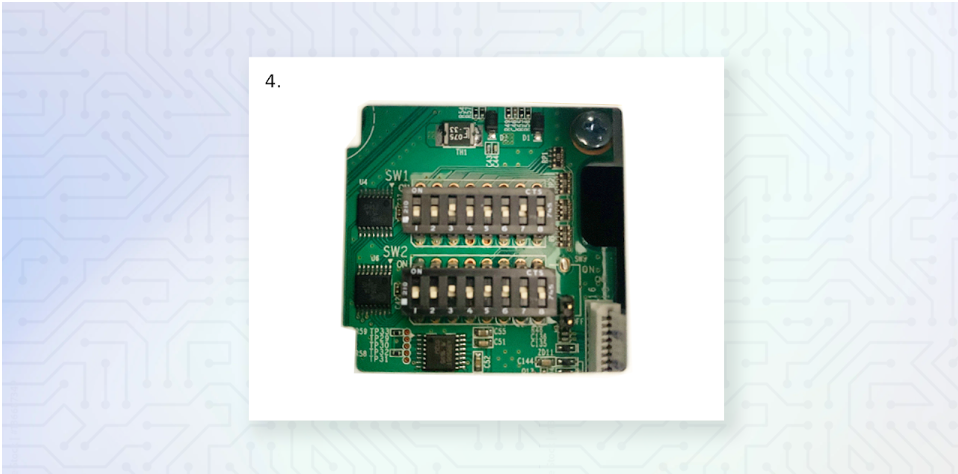
- If this is a Bixolon Printer, then set the dip switches to the correct settings. (If this is a new Plum Kitchen printer OR another manufacturer, skip to step 12)
- Turn the power off to the printer.
- Dip Switches are located under the printer behind a small plate with a single screw.
- SW1: 3 & 7 ON the rest OFF | SW2: 3, 5 & 6 ON the rest OFF
-
- Once switches are changed, Close and secure the cover and turn the printer back on.
Step 12:Follow the configuration guide to get the system operational. Click Here for the Guide
Note:
We would recommend that you have some Velcro style cable ties available for your cable management. This way you can tie up all your loose cabling for a neater and cleaner look plus allows you to disconnect and reconnect for the future.
